Homeschool Room Reveal
Homeschool Room Reveal
*Some of the following links are affiliate links. Please see full disclosure for complete details*
Hello again friends! I am so excited to be sharing this post because I finally have another space in my home that is complete. If you have been following along on my Youtube channel you know that we just started our homeschool journey this year (completely unplanned) but it’s been a great change for my family.
I am so happy I get to teach my children on our own time and curriculum. The flexibility and informal setting has been great, but I still wanted an area that was dedicated to learning.
We first started out in the dining room, but I will admit, it was driving me crazy. There was too much chaos and having to remove everything off the table at the end of the day to eat dinner…. sucked.
However, in our much smaller home, I had to get creative when searching for a space.
Our home is a little older and when we first saw the home we noticed it had quite a unique layout. The stairs to the second floor take you to a landing that’s quite open, but not much can really be done with the space.
(original listing image)
It’s too large to leave it without furniture, but too small to create a living space or media room.
(original listing image)
We hadn’t done much in the space since we moved in, but we did get that nasty carpet replaced as soon as we moved in. It was so gross, it literally sent me to the hospital.
(original listing image)
As you can see from this angle, the area is a little awkward.
Since moving in, I had been using the space for my crafting and video editing. I had a table by the window to film my DIYs and then the desk to the left is where I edited.
I am not going to lie…. it was not pretty.
However, now that I have my Youtube studio, this space is open and I thought it was the perfect opportunity to create a dedicated space for my kids to utilize.
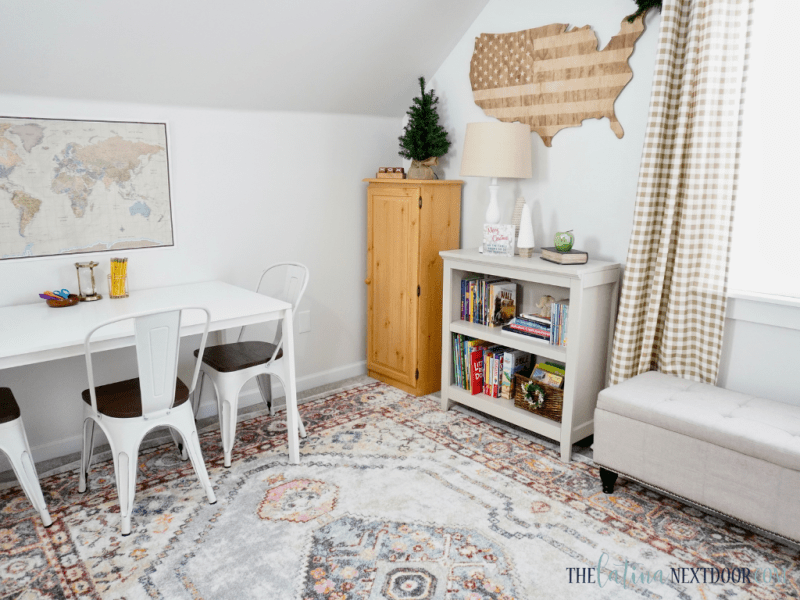
So this is how I transformed the space!
You can watch the entire process in the video below:
The first thing I did was sell the bookcase, move the desk further down the space and paint the walls. My husband also added casing around the window to match the rest of the house. We only have one more window to do in the entire house and then we will be done with all the window molding.
You can read how to add window molding here.
I needed bookshelves to hold all of the kids books and some supplies and I purchased these 2 on Facebook Marketplace for only $10 each. They had great bones, but I wasn’t too fond of the color.
I gave them a makeover and shared the process in my last post. They look so much better now.
Next, I needed a work surface for the kids so I decided to use the table that I used for crafting. I no longer needed it since we found a free desk on FB Marketplace for my Youtube studio.
You can see that desk and how I transformed it here.
As soon as you come up the stairs you walk right into this space so I thought I would add a mirror right above the right bookcase so that it could at least resemble more of a foyer set up instead of a homeschool bookshelf.
The bench under the window is an old bench that used to be in the foyer of my last house. The carpet is from Boutique Rugs and this one is called the Pittsview. I love their quality rugs and I have purchased from them several times.
They were my sponsor for the video I shared above and right now they have a Black Friday sale going on where you can get 65% off plus free shipping! I give a lot more details about Boutique Rugs in my video and if you are looking for a rug now is the time for huge savings!
The curtains are from Plow & Hearth. I had them in my living room, but since I changed the curtains out for Christmas, I brought these up here.
The map is a Trash to Treasure DIY I made earlier this year and the little cabinet is from a yard sale from before I was even married. I love that little cabinet. It cost me $20 way back. I store all of the kids workbooks and binders in there.
The chairs were a FB Marketplace find and I got 4 for $20 each and they were basically brand new.
And of course I had to sprinkle some Christmas touches here and there.
This room was truly so much fun to put together. I really tried to make it cozy and comfortable, but also encourage them to learn.
For the limited amount of money that I had to put this together, I think I did pretty well in pulling this off.
I am so happy with this space. The kids love it as well and really that is all that matters.
If you have limited resources for a homeschool space, consider what you already have and what you can find second hand that can function for your space. Pull things from other rooms that you can use and don’t worry if everything is not perfect.
It’s all about the environment and mood you create. The rest is just material stuff.
I hope you found a little inspiration today! I will see you in the next one.
Until then… adios!


