DIY Gold Tray
Lately, I have been visiting my local Goodwill WAY TOO MUCH… That being said I have made some seriously awesome scores! You just never know when there will be something that will catch your eye. My local Goodwill puts new items out on a daily basis.
No, I don’t go there that often…. yet.
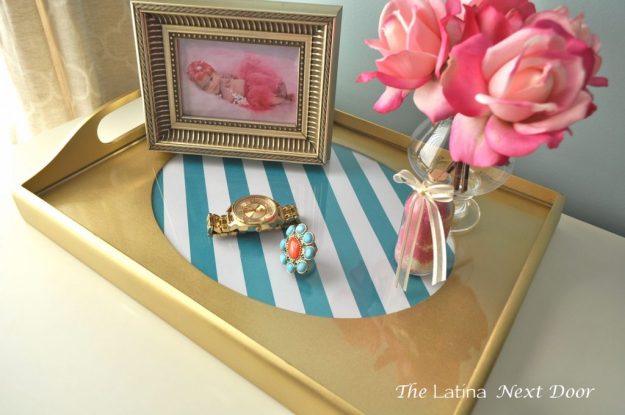
So now that gold is back in style, I have been wanting a cool gold tray for my bedroom (or just because). And this is what I came up with! It only cost $2.92 at Goodwill. Booyah!
Pretty right????? But wait, you just gotta see the before…..
BLEH!
Um, yeah, not the prettiest thing in the world right? Okay, so here is how I did it.
First I took it apart. 4 screws on each end and done.
Oh and that little one you see there is one I found for my daughter. That one cost $2.52. Here is a close-up.
That one was more yucky! I wiped them down and primed them….
Ignore the fruit… those are for another project!
A girl has got to multi-task.
Then I used Krylon’s Short Cuts Metallic Paint in Gold (which I also used on this project here). I used 3. Each were $3.27 but they were 30% off so each one ended up using about $3.50 worth.
Once painted, I placed this scrapbook paper from, you guessed it, Hobby Lobby and taped it underneath the oval frame.
I had to do it at a diagonal because the paper was just shy of the longest part of the oval (D’oh!). But I actually like how it turned out.
Below you can see the back…
I cut off the extra pieces and taped them down.
I used a more colorful chevron paper for my daughter’s tray (each sheet cost $.59 but they were 50% off).
Then, I screwed them back together and there you have it! Totally pretty and gold and unique and… I’m in love with how they turned out!
They could be styled so many different ways.
I like the pink touches….
Another close-up….
And here is one with my daughter’s smaller tray.
Mine ended up costing a total of $6.72 give or take a cent or two. And Natalia’s cost about $6.32. Can I get a whoop whoop!?!?!?
Have you scored any Goodwill treasures lately? Tell me what you think of these trays too! I would love to hear your thoughts!
If you like this, please feel free to subscribe to my blog (you will find a box on the right where you can enter your email). This way you will get emailed every time there is a new post! Don’t forget you can follow me on Pinterest and you can like my Facebook page.
This project is also shared on:
Moonlight & Mason Jars Link Party
Best of the Nest September Link Party
Your Latina,
Yami


Love the transformations, and I am such a sucker for trays! Thanks for linking up at the Pretty Preppy Party!
Thank you Heather! I am so excited about this monthly party! I am new at this so I hope this gives me a chance to meet, learn and collaborate with other bloggers!
Super-cute update! LOVE the gold and turquoise!
What a difference! Great project, now I’m on the hunt for an old tray! Thanks for linking up to the Pretty Preppy Party. xx, b
Thank you for the compliments! I hope to follow you and the rest of the ladies and continue linking up to PPP.
oh… and pinned! xx, b
What a score! And you transformed them into such stunners – love how you added the pattern and color!
Yami, your new trays are so pretty, I love the inset oval and the papers you chose – so fresh and fun with the gold! Thanks for linking these up to the Best of the Nest party!!
Such a beautiful transformation! I love those colors together.
Thank you Brandi!